Showing posts with label Homemaking. Show all posts

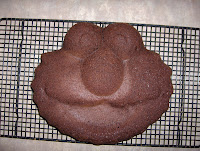
How to make a Cookie Monster Cake

If you have never made a decorated cake before, try this one. The frosting is very forgiving and mistakes can easily be hidden.

Tools needed - All items were purchased from Michael’s using several 40% coupons that come almost weekly in their ad. If you don’t get a Michael's ad go to their website and print them.  You will have to make multiple trips to use the coupons because you can only use one coupon per visit.
• Elmo pan  - $7.79 
• Wilton tip set with #233 & #47 - $1.01
• Wilton tip #4 - $.60
• Wilton coupler - $.60
• Wilton decorating bags (12 ct.) - $2.39
• Wilton coloring – Royal Blue  - $1.20
• Wilton coloring – Black - $1.20
Ingredients
• 1 box cake mix
• ½ cup shortening
• ½ cup (1 stick real butter), softened not melted
• 4 cups confectioner’s sugar
• 2 tablespoons milk
• 1 teaspoon vanilla – Wilton’s makes a white vanilla that can also be purchased at Michael’s regular vanilla will tint frosting slightly. I used regular vanilla in my frosting so decide for yourself if you want the pure white or if you can deal with off white.

Directions
The night before:
1. Make cake according to package directions and bake in the Elmo pan.
2. Cool in pan on a cooling rack 10 minutes.
3. Cut the bottom off the cake so it will lay flat and place cooling rack on top of pan.
4. Flip cake onto cooling rack.
5. Allow to cool slightly; cover with a clean dish cloth and leave overnight.
6. By letting it sit overnight it can slightly dry allowing for much easier frosting.

To decorate:
1. Cream together shortening and butter; gradually add sugar 1 cup at a time and mix in.
2. Add milk and vanilla. Mix.
3. Remove 1 cup of frosting and spread on the eyes. Do not worry about smoothing it yet; just get them covered.
4. Remove ¾ cup of frosting and color black you will need an extremely small amount of color for this!
5. Color the rest of the frosting Royal Blue less than ¼ teaspoon of the tint will be sufficient.
6. Prepare the decorator bag – follow the directions on the back of the decorator bag package on how to insert the coupler and #233 tip
7. Fill bag with blue frosting and squeeze a little out the tip. Start frosting with ½ strokes all around the bottom of the cake. Then add another layer around the bottom. Next, begin to fill in around the eyes, nose, mouth and chin. Continue with ½ inch – ¾ inch strokes all around the cake until everything is filled except the mouth.

8. With a dry finger, go back to the eye and very gently smooth out the frosting on the eye by gently patting it down and molding it into a smooth look.
9. Fill another bag with black frosting. Using the #4 tip draw the eyes on and the corners of the mouth. Change the tip to the #47 and fill in the large part of his mouth. Smooth out the lines with your finger.

10. Enjoy!!

Buying Spices

I ordered spices today and wanted to share how I save money on them. I use a lot of spices and I do not buy them from the grocery store, they are way too expensive. 2 years ago I began ordering spices from The Spice House they are less expensive and such high quality compared to what is at the grocery store. However, shipping can increase the cost so I only put in big orders 1 (maybe 2) times a year. This was my order today and it should last me at least until next summer:
  • ½ cup (1.5 oz.) Mustard Powder, regular yellow
  • 8 oz. Onion, toasted, minced
  • ½ cup (.5 oz.) Oregano, broken leaf, Fancy Greek
  • ½ cup (1 oz.) Thyme, broken leaf, French Select
  • ½ cup (1 oz.) Rosemary, cracked needle
  • ½ cup (.6 oz.) Basil, broken leaf, organic sweet California
  • ½ cup Dill Weed, dehydrated
  • ½ cup (.2 oz.) Nutmeg, ground
  • ½ cup (1.5 oz.) Ginger, ground
  • 1 cup each Cocoa – Natural for baking and Dutch for Hot cocoa
  • ½ cup (2.5 oz.) Korintje Indonesian Cinnamon
  • ½ cup (3 oz.) Pepper Lemon Seasoning
  • ½ cup (.5) Italian Blend of Dehydrated Seasoning Herbs
  • 1 cup (8 oz.) Chili powder
  • 1 cup (8 oz.) Cayenne Pepper, ground
  • 1 cup (3 oz.) Crushed “Caribe” Red Pepper Flakes
  • 8 oz. Black peppercorns, Tellicherry
  • 26 oz. Sea Salt, La Baleine, coarse
With shipping, I paid about $75 for spices, I order the refill bags and use jars I already have.  I did order about 15 new glass jars this time though to replace the plastic ones I have been using (spices store better in glass).  Therefore, I spent an extra $20 on jars bringing my total (with shipping) to $97.49.

Other items I order but didn't need this time are: Onion Powder, Garlic Powder, and Crystallized Ginger Nibs.

If you are just starting out I highly recommend the Basic Spices Deluxe Gift box for $34.95 with 10 jars of spices and herbs the price and quality just cannot be beat in a grocery store.

Cleaning out of the spice cupboard to take inventory for my order.  Notice all the mismatched jars and labels?  I replace those with this order and will have mostly glass jars to put my spices in now.


Freezing Butternut Squash and Pumpkin

Today was the first chilly day of fall and the temp of our house when I woke up was 59 degrees.  Yesterday I purchased butternut squash and pie pumpkins at the farmers market so I thought, "What better way is there to warm up the kitchen than turn on the oven and start baking the gourds in preparation to freeze them?"  This is how I do it:

1.  Wash the outsides of them with a little dish soap and water, rinse well. 


2. Cut in half and scoop out the seeds.
Don't forget to save the pumpkin seeds for roasting!!


3.  Place cut side down on a large pan with sides.
For Squash -  I line the pan with foil for easy clean up.
For Pumkins - I add 2 cups of water to the bottom of the pan to prevent them from drying out.


4.  Bake at 350° for 45-60 minutes or until soft.
5.  Remove from oven and allow to cool about 30 minutes.
6.  Remove peel
For Squash: cut as shown and the peel will be pretty easy to remove with your fingers.  Use a small knife for stuck on areas.
7.  Transfer to a bowl.
For Squash: No need to mash or puree it.  Measure the amount you would like to store and place in labeled freezer bags, containers, or jars.
For Pumpkin: Puree it with a hand mixer first; then place it in in labeled freezer bags, containers, or jars.

8.  Place in freezer.
DO NOT PRESSURE COOK OR WATER BOIL JARS OF PUMPKIN OR SQUASH FOR PANTRY STORAGE!!!   The only safe method of long term storage is the freezer.  The jars of pumpkin above are being stored in freezer jars.

I have favorite recipes that I use pumkin and squash for so I freeze them in sizes that match the recipes.  Most pumpkin recipes call for "1 can of pumkin or 2 cups"; pint size freezer jars fit that size.

I use freezer bags for the squash because our favorite recipes use 5 or 10 cups of squash, or 1 squash and none of these measurements fit in a jar.

Organizing Toys

It is the start of a new month and at the beginning of each month we clean up Gus and Sam's room. This means about 2 hours of sorting and organizing toys.

Why? Because Organizing is Green

So this is what we do:
We keep their toys in labeled Rubbermaid tubs and we start by dumping out all the toys in the tubs that they have played with throughout the month and line the tubs up on the floor.

Next we start putting the toys in their proper tubs until they are all put away:
It is always exciting when we find a piece we have been looking for over the month:
Then, we put all the covers on the tubs and put them in the closet:
About a year ago I purchased a Rubbermaid Configurations Adjustable closet kit and set the shelves to the appropriate heights of the tubs.

Finally, we play with toys we have been missing for the last few weeks:

Why Organizing is Green

Because being organized means you are taking care of your things. When items are cared for it helps them last longer which reduces having to buy replacement items for those that have been lost or ruined.

Taking care of our items increases the chance that when we finally decide to donate an item it will be reused and brought home by someone else. Case in point: I recently donated an original Xbox to our local thrift store. We took good care of the item and when it was donated everything worked on it, it was clean and I even had the original box and manuals for it along with about 20 games in their cases. After I donated it, the store managers put it on the shelf and it sold in one week for $80. Great income to the charity the thrift store supports, great tax deduction for me, and great pleasure to the person who bought it. Do you suppose the same would have been true had I brought in a dusty old Xbox with no working controllers, missing cables, and scratched up games?

For little kids the simple act of sorting toys is educational. For you time spent assisting your little ones with organizing and cleaning now means they will be able to be more independent with clean up tasks in the future.  Plus, kids toys have tons of pieces and by keeping them together they will play with them more frequently.

3rd Week of September Homemaking To Do List

Clothing, Closets, and Organizing
  1. Clean out the coat closet. Have kids try on coats, boots, and snowpants. Donate those that don't fit to charity, or store those that may not fit one child this year but will fit another child in a few years. Start looking for coats, boots, and snowpants at the Thrift Stores.
  2. Halloween is coming! Start checking out the kids Halloween costumes at the Thrift Stores. Also, this is a good time to buy extra costumes for the kid's dress up box.
Yard and Garden
  1. Pull out the tomato cages.
  2. Plant Garlic and tulips
  3. Check out the clearance sections at Target for summer toy items.